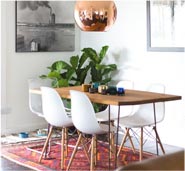
Category: entryway

  • Top 6 Home Lighting Mistakes You Could Be Making

    Top 6 Home Lighting Mistakes You Could Be Making

    One of the best ways to enhance the look and ambience of a home is by putting proper lighting. Today, this does so much more than just light up the home since it’s also a part of the design and architectural element. Even with a small space, you can elevate it with simple changes in your lighting.

    You may not be aware but perhaps in your home, you’ve already started to commit some of the common lighting mistakes. You’ll want to avoid this to prevent wasting time and resources believing your lighting is good when it’s not doing so much for your home apart from illuminating it.

    Usual Lighting Mistakes At Home

    For your awareness, here are the top home lighting mistakes you could be making, so you can correct them with the help of your trusted electrician:

    1. Too Many Downward Lights In The Kitchen

    The kitchen isn’t the right place to put downward lights. Otherwise, the result could be the light shining toward the floor and not on the countertops where it’s supposed to be for the most impact. Remember, your countertop is where you’ll be doing a lot of work in your kitchen. So you need to have a well-illuminated kitchen to see what you’re doing.

    2. Misuse Of Overhead Lights In The Bathroom

    Overhead lights are nice to have in those areas where you’re trying to highlight some features and spaces. It becomes misused only when these are lighting up the wrong spaces like the bathroom. It’s a wrong idea to have overhead lights because this will affect your image. It’ll cast shadows in the wrong places like under your eyes and chin. This will create an unflattering aura, which will make it difficult for you to do your makeup.

    Along this line, you may also want to stay away from yellow vanity lights. White works best, so you’ll get the right colors done on your face.

    3. Failing To Illuminate Distinct Details

    There are certain areas in your home that are best illuminated. But if you aren’t lighting things correctly, then you may be showcasing the wrong spaces.

    For instance, one of the most common mistakes in homes is lighting up a dry and blank wall, which is often the least expensive and least flattering part of any space. When you illuminate a blank wall, you are highlighting what’s lacking: decoration and details.

    Especially when your home has spotlights, be sure these are illuminating the areas wherein details are called for. For instance, shelves with décor and personal memorabilia, stone walls, molding, and arches could be highlighted.

    4. Too Bright Or Too Dull

    Lighting also needs to have the right brightness. If it’s too bright, it may be harsh on your eyes. If the lights are dull, then you might as well just have skipped putting lights at all.

    With technology, you can enjoy more settings in your lights. It’s more than just having a switch on and off. You can have dim settings to control how bright the lights are without necessarily switching it off to its darkest setting.

    5. Disproportionate Chandeliers

    Some rooms in a house are better with accent lighting. But more than just matching the space, it’s important to keep the chandelier or accent lights proportionate to the size of the room and the height of the ceiling. You wouldn’t want to put in lights too big and too long in a space where the room is small. It’ll only look forced and it’ll make your home look unstylish.

    6. Not Installing Multiple Light Sources

    Similar to the dim settings where you should have a variety as to how bright you want a room to be, another common mistake committed is when you don’t install multiple light sources.

    This means you should have different switches, so you can control the areas in a specific room to illuminate. For example, you may want to have small pin lights on each corner and one big light in the middle. In this way, you won’t have to switch everything on, especially come daytime when it’s not necessary to have all lights up to their brightest.

    Conclusion

    These are only some of the few ways bad lighting may have been affecting your home’s overall comfort and ambience. When you address the mistakes above, you’ll find your home looking so much better.

    As minimal as lighting may be, it creates a tremendous effect on giving you a vibrant surrounding. Good lighting doesn’t just make your home look better, but it also improves the overall feel you have in your home. Thanks to Greenelec for consulting!

  • Packing and Unpacking Strategies For a Stress-Free Move

    Packing and Unpacking Strategies For a Stress-Free Move

    Packing up everything you own and moving to a new place seems like a fun adventure. That is, until you realize it’s not exactly an easy process. Packing can be tedious and time-consuming, but it’s not worse than unpacking. If you’ve moved at least once, you know the dread of walking into a room full of boxes with no idea where anything is. But it doesn’t have to be like that. The secret to easy unpacking lies in smart and strategic packing. When you know how to pack before leaving, unpacking will be a walk in the park!

    via Jenny Keenan Design

    Pack Everything You Don’t Use

    People often make the mistake of starting with items they need in their everyday life. But if you want to avoid packing and unpacking boxes several times, start with the things you don’t use daily. That includes:

    • Memorabilia, pictures, diplomas
    • Books and DVDs
    • Out-of-season clothes and shoes
    • Rarely used kitchenware
    • Rarely used bathroom items

    Sort Everything Into Categories

    Once you get the unnecessary items out of the way, it’s time to move on to categorizing everything else. You’ll have to go through everything you own anyway. So, you might as well try and get rid of some things. We recommend you divide everything into three categories: ‘keep,’ ‘toss,’ and ‘donate.’

    To decide which category each item belongs to, ask yourself a series of questions. Is this an item you use often? Is it something that is of sentimental value to you? If the answer to these questions is yes, then the item belongs to the ‘keep’ category. On the other hand, if the answer is no, then you should decide whether the item can be of use to someone else. If it’s not in good enough shape to be donated, then it might be time to say goodbye to it.

    via Jenny Keenan Design

    Room by Room Packing

    Once you have the sorting procedure worked out, the smartest way to pack is to go through one room at a time. It might seem that the easiest thing to do is to just put whatever is nearest into a box, but you have to think of the future you, the one that will have to unpack that mess. So, make sure that each box contains only items from one room.

    That doesn’t mean you can’t start packing your bedroom until you’re finished with the kitchen. It just means that you should keep the boxes from each room separate so that you’ll have an easier time finding and unpacking them later on.

    Extra tip: Once you clear out one room, preferably a bedroom or living room, you can use it to store all your boxes in one place. That way, the space will look cleaner and it will be much easier to take the boxes to the moving truck.

    via Jenny Keenan Design

    Label Everything

    Packing one room at a time won’t be of any help if you don’t know which boxes are from which room. That is why masking tape and a sharpie are your best friends during the packing process. Label everything clearly and be as specific as possible. That means it’s not enough to just write ‘bathroom’ on the box, as you’ll probably end up with several ‘bathroom’ boxes and you won’t know what’s in any of them. A better system is to write things like ‘bathroom — medicine cabinet,’ ‘kitchen — dry pantry,’ etc. 

    It’s also important to note that you shouldn’t use the same boxes for all your possessions. Take a look at this moving boxes guide to learn which boxes you need for your stuff and where you can find them. 

    Stress-Free Unpacking

    If you follow our tips, unpacking is bound to be a much easier process than if you were just randomly opening boxes trying to find a mug for your coffee. If you have an inventory of where you put your belongings, it will be even simpler. Now, once you arrive at your new place you can just check what’s written on your boxes and start unpacking! Here’s how to best go about unpacking.

    via Jenny Keenan Design

    Unload the Truck With Purpose

    After a potentially long drive or flight, probably the last thing you want to do is carry the boxes to the room they should be unpacked in. But that will save you a lot of time later and you’ll be grateful that you can start unpacking as soon as you catch your breath.

    Start With the Necessities

    First off, start with the box that contains the things that will help you keep your home running in the first couple of days. If you didn’t pack a separate box with only the necessities, start with the boxes that contain food, bathroom essentials, and basic kitchenware. But if you want to have a completely stress-free first day in a new place, here’s a guide on packing an essentials box.

    Once you’re rested and used to the new environment, you can move on to the rooms. Just as you packed room by room, it’s the easiest to unpack this way as well. Since all your boxes are already in the room they belong to, it won’t be too much of a hassle.

    Try to Make It Fun!

    Even when you’re organized and have an unpacking system in place, it can still be a bore. So if you want to keep your momentum, try making unpacking as fun as it can be. Play some energizing music through the speakers so that you can hear it wherever you are in the house. Alternatively, if you don’t want to annoy the neighbors right away, put your headphones on and listen to your favorite tunes that way!

    Another way to make unpacking more thrilling is to make a competition among the family members. For instance, you can reward the best organizers or the fastest ones by letting them choose where you’ll order dinner. 

    Give Yourself a Break

    You’ve been through a lot — from making a decision to move and leaving behind your old life to packing and unpacking to setting up a new life. So don’t be too harsh on yourself if everything is not perfect right away. You’ll have plenty of time to settle in and make a home out of your new place! Thanks to Oz Moving for consulting


  • 6 Amazing Decorating Rules for Arranging Your Furniture

    6 Amazing Decorating Rules for Arranging Your Furniture

    Arranging furniture in your home can be challenging especially when you have an empty room you need to spice up. This pushes many people to take the next step and hire interior designers to come and help them out. But you only need to follow a few simple tips and you are good to go even without the help of others.

    Here are simple, amazing, and easy-to-apply rules you must follow to succeed in arranging your furniture:

    entryway

    via Breeze Giannasio

    1. Identify A Focal Point

    A focal point has the power to determine the placement of your furniture in your space. This is the place where you want all your furniture to face. No matter the position of the sofas, everyone must be able to see the focal point. It sometimes exists naturally like a prominent window while sometimes you may have to create the focal point. So, you have to arrange your furniture around the focal point be it a media unit like a television or a fireplace mantel.

    1. Don’t Push Your Furniture Against the Walls

    The size of your space determines how you can place your furniture from the walls. Remember, even if your room is small, you need to give your furniture pieces a breathing space. Wondering how? You have to leave some space like a few inches from the wall to the back of your furniture. This small space makes your room feel bigger with enough breathing space.

    open concept living room

    via Breeze Giannasio

    1. Build Conversation Areas

    People sitting on your furniture must be able to naturally talk and converse with each other without having to shout across your room. Or crane their necks. Well, you must position your chairs and sofas, to face the other. It doesn’t necessarily mean straight on but closes so that people can talk to each other without having to raise their voices. And if your space is too big then you have the task of creating multiple conversation areas.

    living room

    via Breeze Giannasio

    1. Find Balance as You Arrange Your Furniture

    Balance is important as you decorate your room with furniture. Look at the various sizes of the furniture at BFX Furniture and ensure that you don’t place the big ones in one place and small ones in another place too. This makes your room feel lopsided and unsettling. So, you must balance the room by mixing up the furniture to come up with a great balanced look of your space.

    entryway

    via Breeze Giannasio

    1. Buy Right-Size Rugs

    Rugs put under your furniture must be big enough. A particular rug must be of enough size to accommodate all your furniture and ensure that everyone who sits on your furniture can rest on the rug. Moreover, the front legs of all your furniture must sit on the rug and the backs can be on the floor.

    1. Use A Bigger Coffee Table

    Bigger is best when it comes to coffee tables. A big coffee table in your seating area normally located in the middle is ideal for both function and aesthesis. It’s easily accessible by everyone and provides a bigger space for displaying your accessories like flower vessels.

    Succeed At Arranging Your Furniture

    Combining the above rules with the best furniture at BFX Furniture, you can succeed at having the coziest room. Thanks to BFX furniture for consulting!


  • Energy Saving Tips for Next Summer

    Energy Saving Tips for Next Summer

    If you feel like it will be a long, tough winter, you’re not the only one. With people spending more time at home in recent months, power bills could through the roof as we’ve battled to keep our homes cool. With cool weather on the horizon you’ll need to fire up your heaters, but that doesn’t mean things necessarily get cheaper.

    When warm weather approaches, you’ll likely want to use your air conditioner a whole lot more and this can be expensive. But, if you know a few little tricks around the home, you can stay cool through summer without the huge energy bills.

    Lisa Furey Front porch

    via Lisa Furey

    Cooling your home the smart way

    There are plenty of ways to keep your house cool without cranking up the AC all day. Firstly, you want to check doors and windows for poor seals. A bit of weatherstripping helps to close those gaps and stop the hot air sneaking in. Aside from that, try these tips:

    • When there’s a nice breeze outside, open those windows and cool your house naturally. You’ll also probably appreciate the nice fresh air spilling into your home.


    • If you’ve got windows that get a lot of direct sunlight, close your curtains during the hottest parts of the day.

    Lisa Furey exterior

    via Lisa Furey

    • Always service your air conditioner. You’ll need to use it sometimes, so make sure it’s working well.


    • Are you working from home? If you’ve got a nicely sheltered outdoor area, try to work outside. You don’t need the air conditioner if you’re not inside the home.


    These tips can help reduce your air conditioner use, and ensure you’re getting maximum benefit from it when you do.

    Upgrade your insulation

    Even if you’re super vigilant with your household energy saving, the fact is you’ll probably need to run your air conditioner some of the time. When you do, you want to maximise its usage. The key to that is installing quality insulation. If your home isn’t already well-insulated, now is the time to consider it.

    Lisa Furey entryway

    via Lisa Furey

    Even if you can’t pull out walls to add wall insulation, consider at least installing some quality ceiling insulation batts. The roof of your home takes the sun’s full force, and a lot of heat can enter your home through there. Just look for highly rated insulation products, and you can usually install them in the ceiling yourself. This will help trap your cool air inside, and keep the hot air out.

    Energy saving tips for the kitchen

    Stop to think for a minute about how much energy you use in the kitchen. There’s your fridge, dishwasher and hot water usage, not to mention your oven. We think there’s some smarter ways you can use the kitchen during the hotter months.

    Lisa Furey exterior

    via Lisa Furey

    If you’ve got the air conditioner running and you’re using an oven at the same time, they’re competing against each other. Try to avoid using your oven during summer. You can do this by getting outside and cooking on the bbq instead. Additionally, if you do need to use the oven, consider cooking multiple meals at once, and freeze them. You can even consider using the microwave or a small toaster oven.

    Combine all of these energy saving tips together, and you can limit your air-conditioner usage and save money. Thanks to Earthwool for consulting.


  • Understanding the Power Of 3D Rendering

    Understanding the Power Of 3D Rendering

    3D rendering refers to the use of computer software to create three-dimensional images. This solution is commonly used in a variety of industries including medical imaging, real estate, interior designing, safety training, and more.

    Its versatility is what makes 3D rendering such an intriguing new-age solution for commercial entities.

    bathroom

    via Christine Wikman

    Defining 3D Rendering

    The core idea behind 3D rendering is to take any type of object and create an authentic 3D rendering of it using computer software. This helps provide a multi-layered visual of what that object looks like, which is essential in a variety of design-heavy industries.

    Once the imaging has been completed using lights, cameras, and textures, the software “renders” the image into a 3D one.

    How Does It Work?

    Let’s dive deeper into understanding what 3D rendering encompasses.

    There are specific steps associated with taking 2D images and rendering them into 3D ones. Each step plays a role in making sure the design is thorough, customised, and in line with what’s required by the client. Remember, each scenario is unique whether that involves architectural designs or medical imaging.

    bathroom

    via Christine Wikman

    1) The Vision

    It starts with the basics, which means a 3D artist sitting down with the client and going through different sketches/references before creating a complete image. This can include the specific use of camera angles to make those 2D images come to life.

    2) Modelling

    Once the vision is in place, it’s time to start putting the digital model together. This includes creating a physical model (digitally) and going through the various reference points listed by the client until the rendering can be done.

    Living room

    via Christine Wikman

    3) Materials

    A 3D artist has to take the client’s vision and make sure the 3D models are hyper-realistic. This is the only way the rendering is going to yield the desired results. A good example would be taking a physical model and going through a wide array of angles including different types of materials. This can be modified depending upon how the digital rendering is going to turn out and what’s expected.

    4) Lighting

    The 3D artist begins taking the 2D image and working through different types of lighting. The idaea is to create something authentic, visually appealing, and in line with the project’s requirements. This is going to vary from project to project, but lighting does play an essential role when working with different 3D angles.

    bathroom

    5) Rendering

    Once the 2D image is ready to go, it’s time for the software to “render” the visual into a 3D model.

    This can include going back through the 3D renders to refine every part of the model. As a result, most professionals will work through a draught-based process where they continue to make updates after sending it to the client.

    Final Thoughts

    This is one of the most powerful tools available to business owners that want to remain ahead of the curve in their industry. The high-quality RAW files that are going to be sent your way can be a game-changer over the long-term. It’s a wonderful differentiator that can lead to consistent success. Thanks to 3D Walkabout for consulting


  • Bohemian Interiors – A perfect vibe for summer

    Bohemian Interiors – A perfect vibe for summer

    There is something about Bohemian Interiors that just say summer to me.  It’s most likely the laid-back vibe that is also akin to summer at the beach.

    bohemian interiors

    The bright colors and natural textures say “no stuffiness here,” You can also find a lot of natural textures and layering.

    bohemian interiors

    An artistic collection adorns this book shelve without too much worry about symmetry or adhering to a palette.  It’s perfectly off-balance.

    bohemian interiors

    A fun gallery wall.

    bohemian interiorsYou don’t need to go wild with color to have a bohemian style.  With a lot of layers of soft surfaces and textures, even this rather monochromatic space gives off a laid-back but cultured vibe.

  • Home DIY: Cool woodworking projects and the tools required

    Home DIY: Cool woodworking projects and the tools required

    Woodworking Projects

    Working with wood is incredibly satisfying, and the pride of creating a really cool, useful object for your home is very rewarding. Wood furnishings and decor are solid, have a great feel and each has a unique pattern only nature could provide. The ability to find a design and make the item yourself from start to finish provides satisfaction that can last a lifetime. Woodworking does not require a workshop larger than a dorm room or a whopping budget. Building wood projects yourself has advantages and is a lot of fun. It requires only a modest budget for a few basic tools to get started. Some great practical starter projects are suggested below.

    DIY wood media box

    Benefits of DIY Woodworking

    Making it yourself has several advantages. First, you can customize what you’re building. Rather than search for the exact size, color and features you want, find a plan and create it. By making it, the choice of material, finish and size is in your control. A second reason is the cost. Even if you could find everything you want available for purchase, you may pay a premium for it. Making it yourself, especially when working with all-wood or reclaimed wood projects , is frequently far less expensive. A third reason is that creating items can be mentally stimulating. Using math, doing 3-D spatial visualization and following detailed directions engages the left side of your brain while the creativity of finishing a piece and improvising when necessary engage the right side. Woodworking uses both sides, so whichever side of the brain you normally use, most woodworking is a part comfort zone and part experience in new terrain.

    DIY shoe rack

    Tools to Get Started

    A few basic tools will be required to get started. It does not have to cost too much at first. As you take on more challenging projects, you can upgrade some of the hand tools to power tools. All of these tools can be used for many other projects around the house with a power tools guide.

    • Power drill. It’s worth spending money on a drill that gives not only good power but options for attachments. Some come with an impact driver, which can drive a screw without a pre-drilled hole. A variety of drill bits, including a countersink bit, screwdriver bits and paddle bits will come in handy. A pocket-hole jig to create angled holes is useful for many jobs. 
    • Miter saw. A miter saw helps get straight or angled cuts exactly right every time and you will be surprised how often you use it. A compound miter saw does beveled cuts and a sliding variation will cut wider pieces of wood, so anticipate your needs, space and budget when buying. 
    • Circular or jigsaw. A circular saw is the ideal tool for long lengths of wood, which the miter saw is unable to do. A jigsaw is light and flexible and best for cutting shapes.
    • Dremel tool. I LOVE my dremel tool.  The more you use it the more you discover all the ways it can come of use around the house.  It can also add decorative effects to trim pieces or carve grooves to create joints where boards meet. You can sand, carve, clean and more. Both the 4000 and the 4200 will serve you well but there is a cool difference between the two tools and there is no doubt that the newer 4200 offers a higher level of convenience. For more information head over to: https://besttoolreview.net/dremel-4000-vs-4200/ 
    • Hand tools. An assortment of basic hand tools to have on hand would include a hammer and counterpunch, wood rasp and chisel set, sanding blocks and a variety of clamps.
    • Safety equipment. Basic safety equipment to stock would include safety glasses, masks to avoid inhaling sawdust and ear protection
    DIY clothes rack

    Suggested Starting Projects

    Finding plans for projects is easy. Hundreds are available for free online or in library books and those TV shows with the giant workshops often offer their plans at the end of the show. Below is a list of woodworking projects perfect for a beginner that rely on basic tools. Accessories: A variety of easy-to-make home accessories are available that will be practical and help you get to know your tools.

    • This super-easy cutting board uses a variety of woods for a striking effect, although it requires a power sander or planer.
    •  

    DIY shelves Storage: Everyone can use more storage options and shelves are a good first project.

    DIY table Tables: Tables offer a variety of uses, indoors, outdoors and in the workshop. Here are three inexpensive designs that are easy to build and can be used in a number of ways:

    DIY planters Garden planters: Outdoor garden items make good starter projects because they’re often simple to make and there’s less perfection expected for items that are going outdoors. The last two projects call for expensive cedar because it is naturally weather-resistant, but a less expensive wood could be substituted and coated with outdoor paint, especially if the plants are going to be in individual pots.

    • These super-simple plant stands create a designer look for a few bucks.
    •  
    • This window box would add instant curb appeal.

    At the end of a woodworking project, you have a customized item ready for use, but that’s not all. You also have additional skills that have prepared you to tackle your next project. Thanks to Dremel for contributing!

  • Home Improvement: Why DIY?

    Home Improvement: Why DIY?

    At this day and age, Do it yourself, commonly known as DIY, is no new term to our ears. DIY’s are the new in thing, and rightfully so. When it comes to home improvement, many people have now turned to DIYs. And if you are wondering if you are fit enough to try them out, the answer is yes, you are. Everyone is capable of coming up with something, and thanks to the internet, you can find tons of information on the same. If you want to revamp your new home that you bought from Movoto? DIY is the way to go! And here are the reasons why;

    via J. Patryce Design photography: Christian Harder

    1.      It is cheaper.

    This is no brainer. One of the most stressful things that most homeowners think of when they want to revamp their homes are the costs. Many people think that a revamp costs an arm and a leg, and some will even opt to do away with the idea. But you do not have to shutter your makeover dreams in the name of costs anymore, just DIY! By doing things yourself, you will save on very many expenses, including labor costs. With enough knowledge from the online resources, you can be able to buy affordable materials that will help you with your project.

    2.      It gives a sense of fulfillment

    It feels incredible getting things done by yourself. Imagine sitting in your living room, enjoying your coffee as you look at the beautiful artwork that you did yourself- Simply fulfilling! The sense of achievement makes you want to try out even more things. It is a great way to see that nothing is impossible if you set your mind on it.

    via J. Patryce Design photography: Christian Harder

    3.      You get to learn a new skill

    Did you ever think that you would be able to paint the walls? Or even install a new floor in your home? Well, DIY’s give you the opportunity to get to learn something new that adds value in your life. And the good thing is that no one rushes you to complete your DIY’s. You can watch as many videos as possible, read as many articles as possible before getting started. By doing this, you will find yourself learning new things each day. And this is also a great way to extend your skills to your family members and friends to. It always feels good to bring others on board by teaching them something new. And this leads us to the next point; you can use your new skill to earn money

    4.      You can start your own business

    As the old maxim goes, information is power. Getting to learn more about something and even how to do it is a great resource. After doing one or two DIY’s, you, in turn, get good at it and even become a pro. People around you might notice your skills and even ask you to work on some of the projects that they have. Of course, they will have to pay after you complete working on the projects. Within no time, you get known and even get referred to other people. At the end of it all, you might find yourself having an extra source of income, all thanks to the DIY skills that you taught yourself.

    via J. Patryce Design photography: Christian Harder

    5.      Increases the value of your home

    Fixing your broken fixtures in your house, or building a shed in your backyard not only improves the aesthetics of your home but also adds equity. Ensuring that everything works perfectly in your home and doing some home improvement projects saves you a lot, even in the future. In cases where you might need to sell the house, the chances are that you will get a good buyer ready to pay up for the house. Remember, buyers always look at the condition of the home before making their purchase. Someone will only buy the house if they feel it is in good shape and is also aesthetically appealing.

    6.      It is fun

    What better way to bond with your family than engaging in some DIY’s while at home? It feels good to spend time with your loved ones creating something from scratch. You can allocate tasks depending on the ability of every family member. This helps you work in harmony and make the project a success. You will find yourself making jokes in the processes, which is a great way to create long-lasting memories. At the end of it, you can reward yourself with a barbeque and some cold drinks.

    7.      Keeps your brain at work

    DIY projects are a great way to keep your brain at work at all times. They challenge you and keep you thinking of how you can improve things in your home. You no longer think of having someone do it for you, but think of how you can get it done by yourself. This, as a result, pushes you to think harder and even dig deeper into researching on how well you can start a project from start to finish.

    via J. Patryce Design photography: Christian Harder

    8.      It has immense health benefits

    Did you know that DIY’s have significant benefits to your health? Thought you should know. After a long stressful day at work, doing some DIY can help you relive that stress instantly. And the good thing is that DIY projects need not be very complicated and time-consuming. You can easily make a picture frame within 10 minutes, and something as simple as that boosts your mood almost immediately. Also, DIY’s are a great way to boost your self-confidence. As aforementioned, completing the projects gives you a sense of satisfaction. And knowing that you are able to come up with something boosts your self-esteem. Besides, DIY’s are a great way to be on the move- especially those that are a bit demanding, such as painting the walls, building a shed, replacing the window treatments and so on. They can help you keep fit physically.

    Take Away

    It is always good to challenge yourself by trying out a new DIY project, and what better way to save a few bucks than DIY’S! Thanks Movoto for contributing!

  • Storage Made Easy with these 5 Furniture Options

    Storage Made Easy with these 5 Furniture Options

    If your home or apartment is majorly cramped, then make the most out of your small space by choosing furniture that can pull double duty. Savvy couples depend on flexible, versatile pieces that are on-trend and control the clutter.

    With that in mind, put the pizzazz back in your home with bedroom sets, sofas and other necessities made to give you the storage you crave, with a look you’ll love.

    1. Bedroom Sets

    via Lisa Furey Interiors

    A cluttered bedroom doesn’t make for a soothing sanctuary, as most people tend to sleep better in a room that’s clean. Enter queen bedroom sets

    With built-in storage that can tidy a bedroom in a flash, the under-the-bed drawers featured in these sets will turn any bedroom into an organization station. Simply use the handy drawers to stash extra sheets and pillowcases or workout clothing.

    Traditional nightstands offer the additional space you need to keep surfaces mess-free. The enclosed space keeps books and magazines dust-free (and within reach), with a convenient spot to set your phone.

    2. Sofas

    via Lisa Furey Interiors

    If your living room is in chaos, rein it in with the right sofa. Opt for a sofa with room underneath it to fit a flat plastic storage container, soft storage bag, flat baskets or trays. Indeed, these items are perfect for keeping items like remote controls, children’s toys or throw blankets stashed out of sight yet still accessible.

    Bookworms can free up shelf space and stack magazines and books in plain sight for functional, open under-sofa storage. Free up room on your shelves for other home decor must-haves.

    via Lisa Furey Interiors

    3. Servers and Buffets

    Want to avoid the cabinet avalanche? Then it makes sense to clear out cluttered cabinets, drawers and random closets in your home and put those unreachable dishes and serving ware back into service. 

    As an idea, buffets provide plenty of closed storage and drawer space for convenient entertaining. These pieces work best for holding dish sets, cutlery or mismatched linens you may not want on display.

    Servers, or tall open shelving units, highlight dishes, platters and bowls, making setting up the table a breeze. Simply sort dishware by type or color for an eye-catching yet useful addition to any dining room.

    via Lisa Furey Interiors

    4. Entryway Benches

    Shoes, keys and umbrellas can junk up any entryway. While an entryway bench can help declutter that space, you’ll want to go beyond a basic bench or simple wall hooks. Dash out the door with less fuss and last-minute scrambling for wallets or watches when you update your space with entryway benches. 

    These pieces not only provide a comfortable place to put on your shoes, but shelving or baskets keep important items all in one place. Designate separate baskets or shelves for every member of the family. With a place to set your planner, your partner’s scarf and the dog’s leash, the morning routine can run that much smoother.

    via Lisa Furey Interiors

    5. Accent Cabinets

    Blank walls do nothing to help ease storage woes. Conversely, accent cabinets up the style and organization factor in any room of your home. They are the perfect blend of display space and enclosed storage wrapped up in one pretty package.

    Whether you fill your accent cabinet with puzzles, toiletries or bar supplies, the options are endless. You can find one to fit almost any purpose. Choose a mirrored front cabinet to reflect light and brighten dark corners or a snappy finish to complement or perk up any room.

    Furniture Picks for Couples in Need of Storage

    Get organized with queen bedroom sets, sofas or an accent cabinet with well-made pieces that work for you. And add functional, flexible furniture to give you the space you crave, without remodeling or moving. Thanks to Rooms To Grow for contributing.

  • Beautiful and Classic interiors: Interior design by Kate Marker

    Beautiful and Classic interiors: Interior design by Kate Marker

    Kate Marker Interiors blends the old and the new

    I’m having a serious designer crush on Kate Marker Interiors.  As I’m sure many of you know, raising a toddler adds serious chaos to your life, both mentally and physically.  The constant picking up of toys on top of being there 24/7 to tend to your little one’s beck and call can be draining.  While there are many moments of joy to fill you back up, you also need an environment that decompresses, and for me nothing does that like a soothing, clean and serene space.  I think Kate Marker’s interiors do just that.

    Having a sleek and functional entryway helps you leave the day’s stresses at the door and helps prevent it when you’re trying to leave for the day! I LOVE the built-n cupboards and drawers

    As an order and organization junkie these bookshelves are such a sigh of relief.  I love the overhead lighting via the gold sconces too.  Using the shelves as a sort of gallery space for art is clever too!

    Nothing like a crisp white bathroom

    Peppering you house with meaningful vignettes is a beautiful way to decorate.

    Normally I don’t go for monochrome spaces but this dusty blue is so beautiful

    There is a soothing Shaker quality to this hall

    An intimate and light-filled seating area in the bedroom is a happy refuge