


I’m back from Europe – with a book giveaway!!

Hi everyone! I'm so excited to be able to post on a regular basis again! The trip was absolutely amazing and I promise to share pictures of my boyfriend and my 9 week journey - but first I have to do some photo organizing. I thought I'd welcome everyone back with a book giveaway, Mark Montano's...
Hello from Berlin! More pictures from my Europe trip

The pictures below are from the beautiful Picos de Europa, in Spain. My favorite part was probably getting to take in the beautiful views alongside the cows that graze the mountain tops.The traffic jams were caused by livestockOne of the most amazing parts of being on this mountain top valley was the chorus of cowbells you could hear...
Hello from Salzburg, Austria – more pictures from the beginning of my trip!

I am having an amazing time traveling around Europe. We have been to Spain, Italy, Switzerland, Germany, and Austria. So far Germany has been my favorite because the houses are simply charming and the gardens are so beautiful. I will post pictures in due time, but first here are more of the...
Pictures from my European backpacking trip!

I know these are a long time coming, but getting photos in order while traveling has been tough. I am in Munich right now and finally have a moment. All of these photos are from Spain, in the beautiful region of Galicia. Absolutely gorgeous!The Cies Islands - unbelievable! I will post a lot more picture of...
sponsored post -Carpet so gorgeous you might not miss hardwood

Hardwood gets a lot of attention - and while I will not deny that I love a rustic wideplank floor, there are some rooms where carpet is a bit more appropriate and welcoming.However, I think it is important that the carpet is something you love the look of, and when I was introduced to Fun on the Floor I...
Hello from Barcelona!

Hi everyone! I´m having an amazing time on my 9 week European tour so far. We´ve been to Galicia, the Picos de Europe in Astoria, Santiago de Compestela, San Sebastian, Bilbao, and now we are in Barcelona (All in Spain). Tomorrow night we are leaving to travel Italy for two weeks. I promise I´ll try and upload photos at...
Hello from Santiago de Compostela!
Hello from Santiago de Compostela, Spain. As some of you know, my boyfriend and I are travelling around Europe for the next 9 weeks. We´re only a few days days in, and it´s already amazing. I plan to update you with some photos in a few days, so stay tuned!
An intriguing and whimsical housetour

I'm leaving for my big trip tomorrow - 9 weeks in 11 different countries. I'm freaking out a little -feeling just completely overwhelmed. I'm going to try to post as often as possible - depending on our hotel(s) internet situation - as I'm not bringing my laptop- yikes! I'm already suffering from phantom laptop syndrome. I...
A supercute shop with tons of vintage shabby-chic goodies

Hi all - I hope everyone had a great weekend. I wanted to introduce you to this adorable shop - Blue Carrot. Here are some of my favs -Love this typeset drawerI think these images will easily entice you to go take a look - www.bluecarrotshop.comThey have some great sales too!
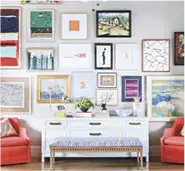
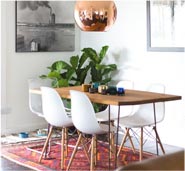
Inspiring entryways

We all know by now an entryway is important. For me, not so much when I leave the house but definitely when I come home after a tough day. It's instantly calming for me to be greeted with order, a place to put my mail, shoes, bag, and keys. Here are some spaces that - thought might...